Kubernetes Ingress routing with TLS and network polices on KinD cluster
Introduction
Outline steps to implement some of the Kubernetes advanced concepts.
- Create a local Kubernetes in Docker (KinD) cluster with multiple nodes. Kind cluster gives a similar experience as a production Kubernetes cluster on your local desktop.
- Setup a simple ingress routing using Nginx ingress controller.
- Introduce TLS encryption to ingress routing.
- Compare the Network policies between Cilium CNI and Kubernetes CNI.
- Discuss some of the advantages using Cilium as CNI in networking, observability and service mesh.
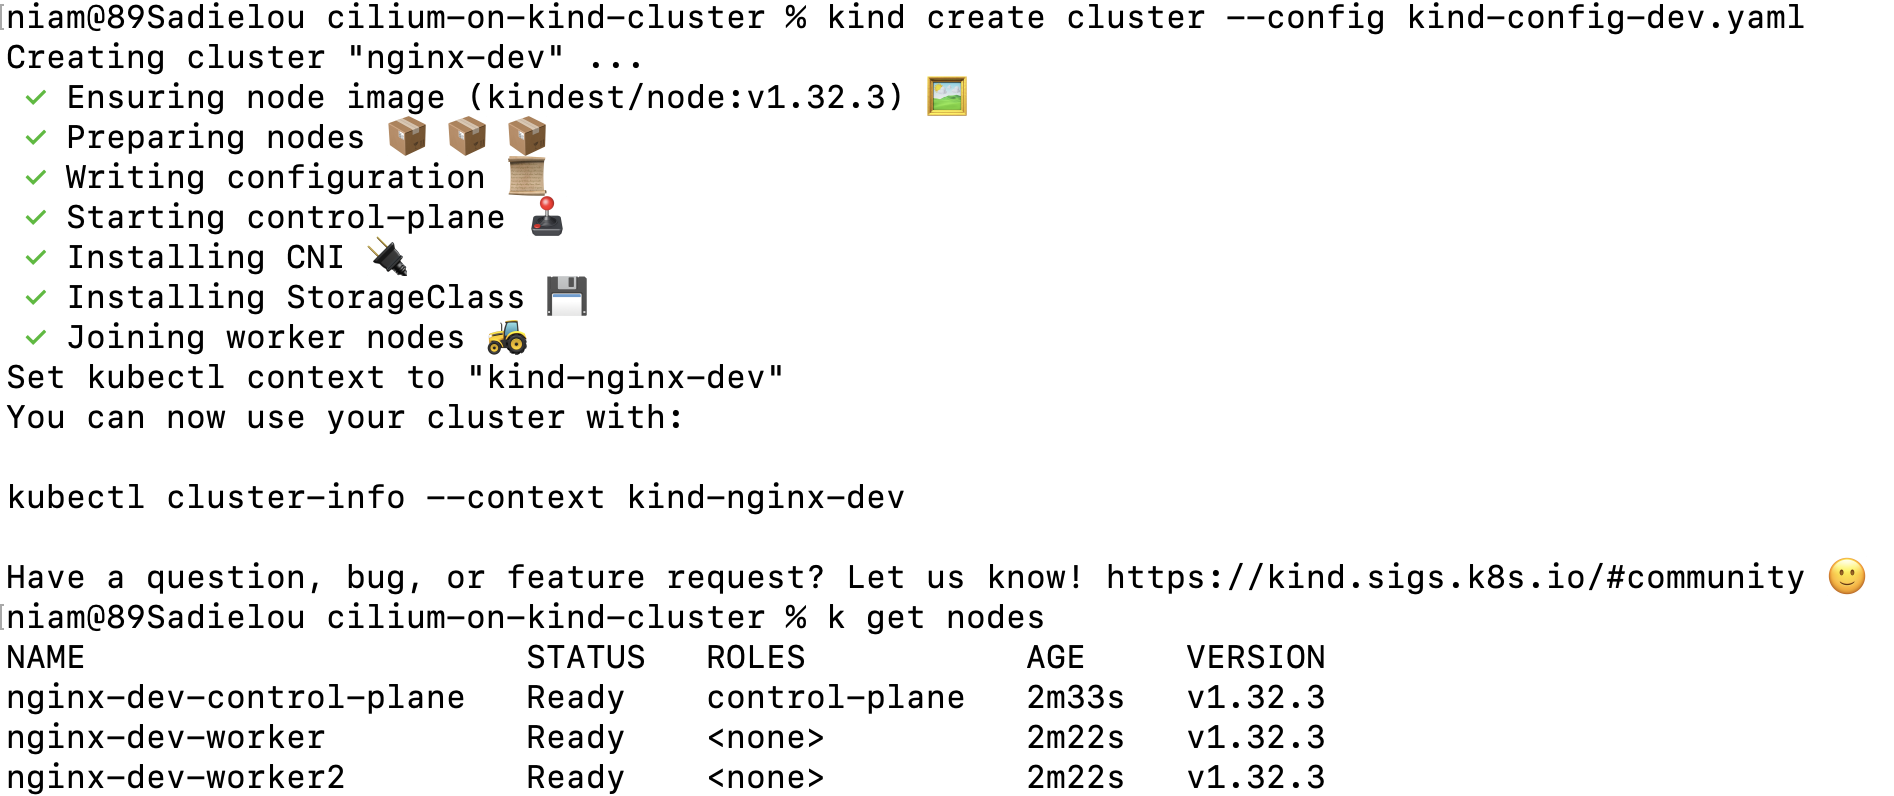
Create Kubernetes KinD cluster locally
- Install KinD from here - https://kind.sigs.k8s.io/docs/user/quick-start/
- Create a cluster with 3 nodes - 1 Control node, 2 Worker nodes
- Allow control node to make requests to ingress controller over ports for both http (80) and https (443)
1
2
3
4
5
6
7
8
9
10
11
12
13
14
15
16
17
18
19
20
apiVersion: kind.x-k8s.io/v1alpha4
kind: Cluster
name: dev
nodes:
  - role: control-plane
    kubeadmConfigPatches:
      - |
        kind: InitConfiguration
        nodeRegistration:
          kubeletExtraArgs:
            node-labels: "ingress-ready=true"
    extraPortMappings:
      - containerPort: 80
        hostPort: 80
        protocol: TCP
      - containerPort: 443
        hostPort: 443
        protocol: TCP
  - role: worker
  - role: worker
- Now we have KinD cluster with Ingress enabled.
Ingress Routing with Nginx Controller
Apply Nginx controller
1
  - kubectl apply -f https://raw.githubusercontent.com/kubernetes/ingress-nginx/main/deploy/static/provider/kind/deploy.yaml
Ingress controller is up and running

Application deployment and a service
Create a deployment.
1
  - kubectl create deployment my-test-app --image=nginx
Create a service for the deployment.
1
  - kubectl expose deployment my-test-app --name=my-test-app-service --type=ClusterIP --port=80 --target-port=80
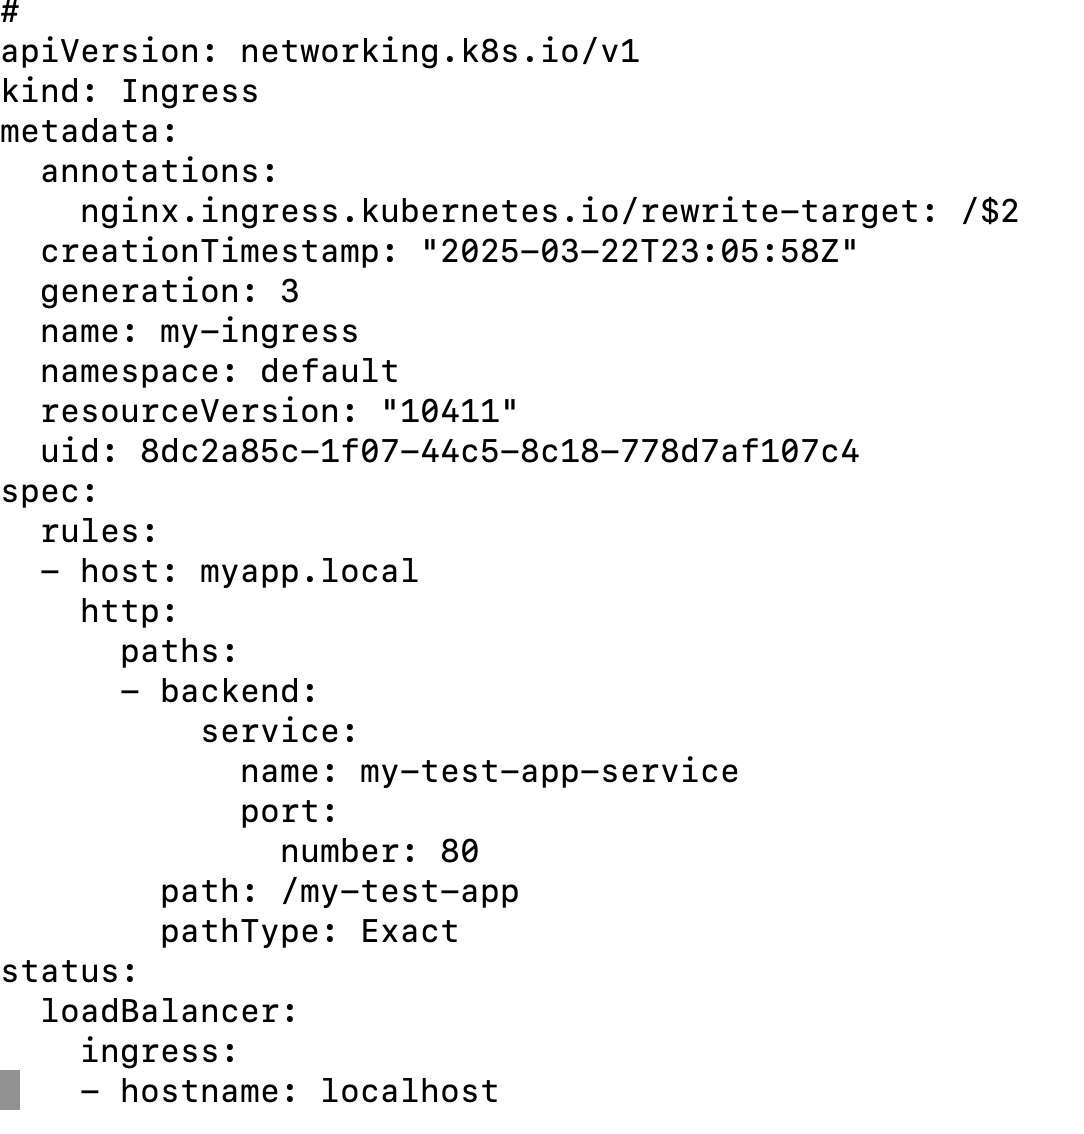
Ingress Resource
Create ingress resource to define routing rules.
1
  - kubectl create ing my-ingress --rule="myapp.local/my-test-app=my-test-app-service:80" --annotation nginx.ingress.kubernetes.io/rewrite-target=/$2
This is how Ingress rule looks like after execting the above command.
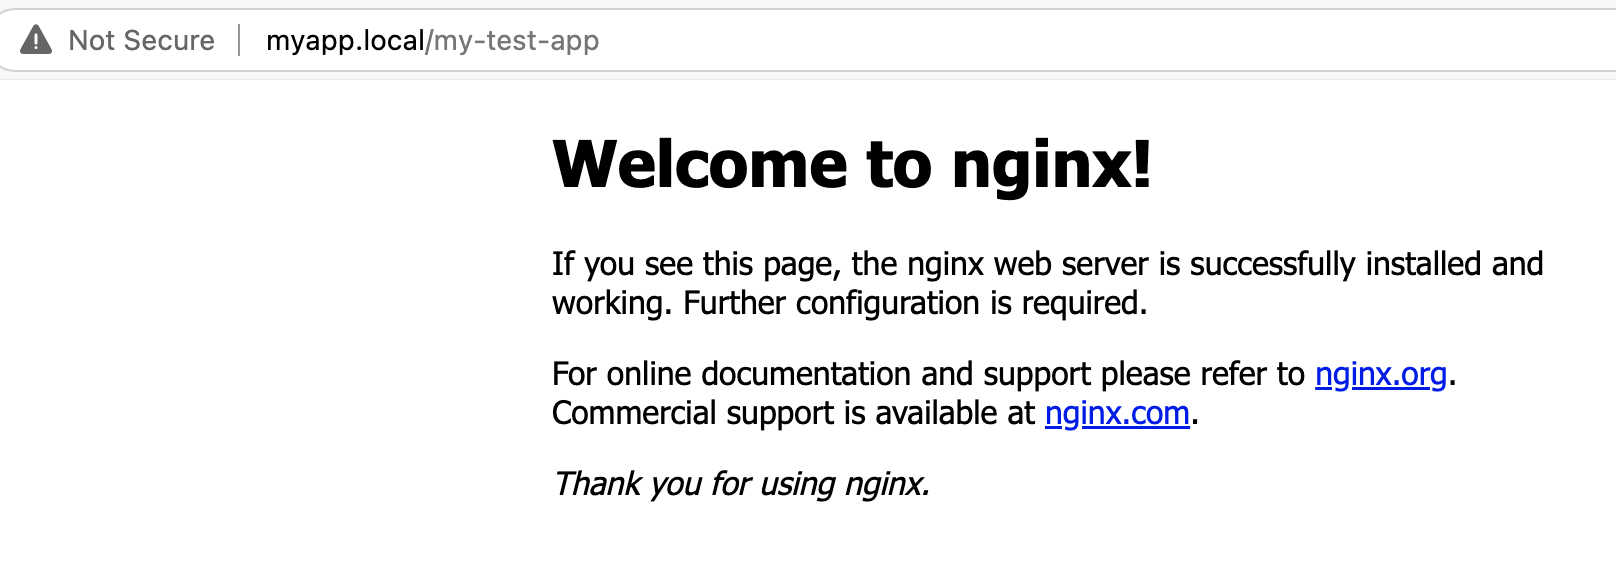
Local DNS mapping and Test the APP
1
2
3
    - Update the file /etc/hosts to create a record: 127.0.0.1 myapp.local

    - test it: curl http://example.local -v
- Access it from the browser:
TLS enabled Ingress Resource
Self Signed certificates
Real production workloads will always be encrypted with Certificate Authority (CA) signed TLS certificates. Here lets create self-signed certificates using using OpenSSL tool. This certificate will enable TLS encryption with ingress routing.
Cretae a TLS Key.
1
  - openssl genrsa -out tls.key 2048
Create TLS certificate - Note the domain name in CN which is matching with my local domain.
1
  - openssl req -x509 -new -nodes -key ingress-tls.key -subj "/CN=myapp.local” -days 10 -out tls.crt
Optional - View certificate details
1
  - openssl x509 -in tls.crt -noout -text
Kubernetes Secret
A Kubernetes secret for TLS is required. Lets create one.
1
    - kubectl create secret tls my-secret --cert=tls.crt --key=ingress-tls.key

Enable TLS in Ingress Reource
- Edit the ingress resource to enable TLS or delete and recreate the ingress resource.
Delete the previous ingress resource rule
1
  - kubectl delete ing my-ingress
Create ingress resource rule with tls enabled
1
  - kubectl create ing my-ingress --rule="myapp.local/my-test-app=my-test-app-service:80,tls=my-secret" --annotation nginx.ingress.kubernetes.io/rewrite-target=/$2
Test the application with https.
1
  - curl https://example.local --insecure -v
- Access it from browser by accepting the insecure warning.


Network Security with Cilium CNI (Container Networking Interface)
1
2
3
4
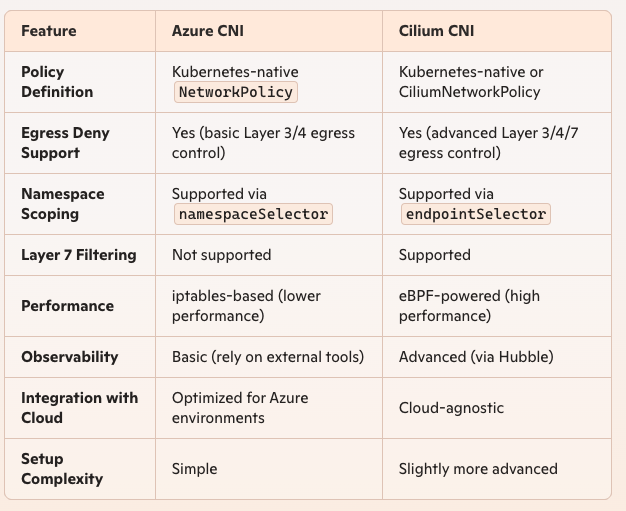
- Cilium is lightweight, best performed CNI and is eBPF based that works directly with Linux Kernel to will eliminate sidecar and kube-proxy.
- Cilium is best suited for Layer 3/4 and Layer 7 network policies. Other CNIs like Calico, AzureCNI only support Layer 3/4 policies.
- Observabilty with Hubble with live monitoring of traffic - May not matured compare to istio or Prometheus/ Grafana based monitoring.
- Cilium can also used as ServiceMesh for traffic routing. However, Istio is still preferred for rich features, complex and multi-cluster routing, secure pod-to-pod communication using mTLS.
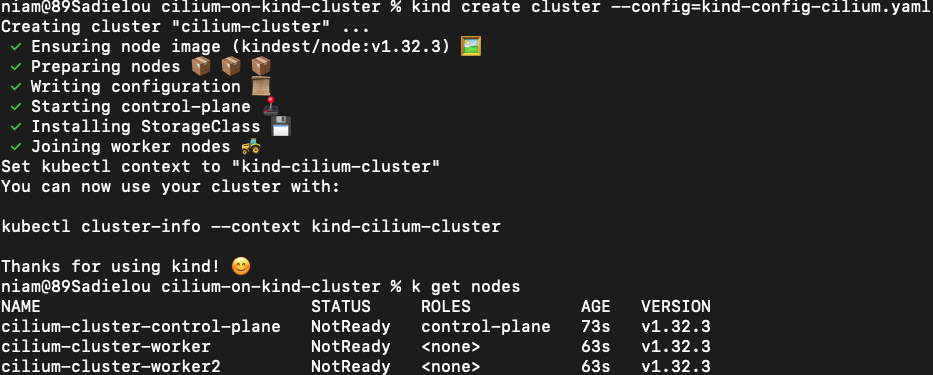
- Setup a separate Kind cluster with Cilium CNI. Lets understand the advantages of CNI by comparing network policies of CiliumCNI to default Kubernetes CNI (similar to Calico or AzureCNI).
1
2
3
4
5
6
7
8
9
apiVersion: kind.x-k8s.io/v1alpha4
kind: Cluster
name: cilium-cluster
nodes:
  - role: control-plane
  - role: worker
  - role: worker
networking:
  disableDefaultCNI: true
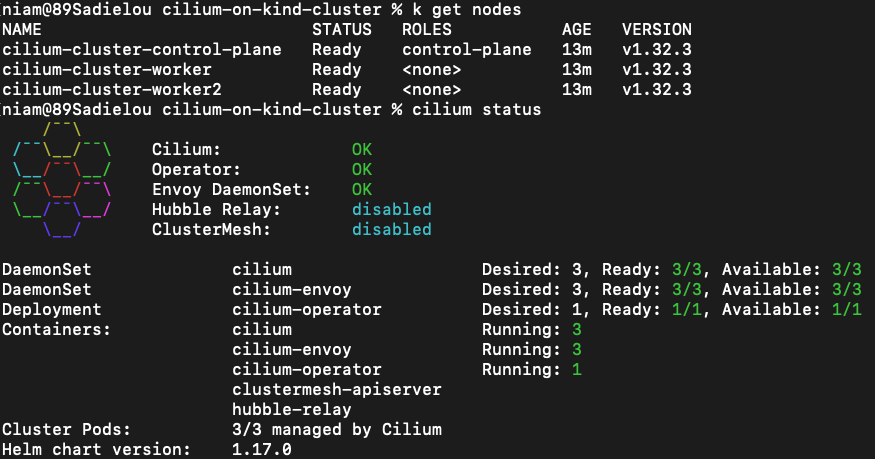
notice that cluste is not ready yet. it is because there is no CNI installed.
lets download and install cilium CNI in KinD cluster: https://docs.cilium.io/en/stable/gettingstarted/k8s-install-default/
1
  cilium install
Now cluster nodes and pods will be in ready state.
Create a deployment and its service
1
2
3
  - kubectl create deployment my-test-app --image=nginx

  - kubectl expose deployment my-test-app --name=my-test-app-service --type=ClusterIP --port=80 --target-port=80
Compare network policies
In contrast to Calico and Azure CNI, Cilium natively supports Layer 7 policies by leveraging eBPF for deep packet inspection. Cilium can enforce application-aware policies directly and efficiently, such as allowing specific HTTP methods (e.g., GET, POST) or filtering by URL paths and hostnames.
Lets apply the network policy to deny all egress traffic from default namespace
1
2
3
4
5
6
7
8
9
10
apiVersion: "cilium.io/v2"
kind: CiliumNetworkPolicy
metadata:
  name: deny-all-egress
  namespace: default
spec:
  endpointSelector: {} # Match all pods in the default namespace
  egressDeny:
    - toEntities:
        - all # Deny all egress traffic to all destinations
Create the policy and view.

Login to the pod in the default namespace and try to browse google or microsoft. Egress traffic is being blocked.

References
https://dev.to/iamunnip/kind-setting-up-cni-using-calico-part-7-31p2